Made to order / Planning guide
Water Under a Shower Door: How to Identify the Leak Path Before Changing the Seal
Water under a shower door does not prove a faulty seal. Document the first visible crossing, compare leak paths and prepare a custom OEM review record.
By AimeShower · Published · Updated
Water under a shower door does not, by itself, show that the bottom seal is faulty. A puddle records where water has collected. It does not establish where water first crossed an enclosure interface, or whether the route was visible. Changing a seal before recording that distinction can remove useful evidence without explaining the symptom.
This guide is for buyers, project coordinators and installers discussing a non-standard custom enclosure or OEM configuration. It proposes a way to document a shower door leaking at bottom level before deciding which interface needs review. It is not a universal replacement-seal guide or an installation procedure.
Start with three observations already available from the reported event; leave anything not witnessed as unknown:
Earliest observed crossing: where water was first seen crossing an enclosure interface, or “crossing not observed”.
Final pooling point: where water collected, recorded separately from the crossing.
Door position and timing: whether the door was open or closed, and when the symptom appeared relative to movement.
Compare this record with the observation-to-review matrix to identify missing evidence and the next review owner. These observations do not confirm a cause or authorize work on the enclosure.
1. Separate the observation from the explanation
Use three labels in the project record:
Observation: what was actually visible, where and when. “Water appeared outside the lower corner after the door opened” describes an event without naming a failed part.
Hypothesis: a possible explanation that still needs evidence, such as water travelling down a side interface before reaching the bottom corner.
Cause confirmation: a conclusion supported by an assessment of the actual configuration, the applicable instructions and evidence that addresses competing explanations. Record who made that assessment and its limits.
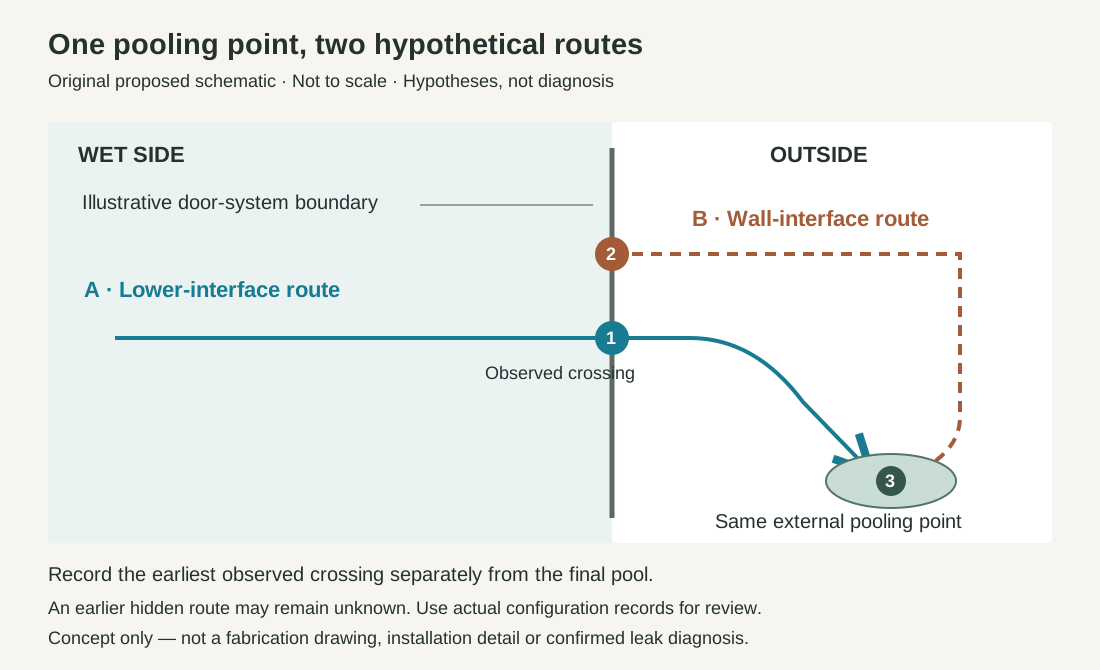
Call the first crossing you can document the earliest observed crossing. That wording matters: an earlier hidden route may exist. If recording began after the floor was already wet, write “crossing not observed” instead of reconstructing a path from the puddle alone.
Preserve the sequence. A close-up of the final pool can locate the symptom, but an overview and time-linked detail can show how the observation relates to the door, adjacent wall and threshold. Label missing intervals or obstructed views. Do not turn “not seen in this recording” into “did not occur.” [A1 — proposed evidence vocabulary]
2. Map the visible route before naming a component
Give locations simple identifiers on a sketch of the actual enclosure. Keep the wet side, outside area, moving panel, fixed panel and wall interfaces identifiable. Use the same identifiers in the photograph filenames and observation record.
The schematic below compares two hypothetical routes that converge at one pooling point. Route A crosses near the lower door interface. Route B begins at a wall-side interface and reaches the same area. The arrows illustrate possibilities; they are not a diagnosis of any supplied enclosure.
KOHLER’s 1246188-2-E troubleshooting section distinguishes leaks under the panel, at wall or strike jambs, and between the side panel and wall jamb. These are checks for its listed models. S1 — Water leak, items 1–3
For a custom project, use the installed arrangement and its documents to identify relevant interfaces. Similar-looking enclosures can have different components and water-management details. A diagram from another model does not identify which joint should be sealed, left open or adjusted on yours.
3. Let the responsible installer define safe observations
Start with the job reference, configuration, drawing revision and applicable model-specific instructions. The responsible installer should determine whether further observation is appropriate, where to stand and when to stop. Keep the work non-destructive. Do not remove glass, loosen fixings, block drainage paths or add sealant merely to make the symptom change.
Record the normal-use conditions under which the symptom was reported: door position, shower outlet in use, reported spray direction and timing relative to opening or closing. Distinguish what the observer witnessed from information supplied by someone else. If a condition is unknown, leave it unknown.
Any controlled observation must follow the actual model’s instructions and the site team’s agreed limits. This article does not authorize a flood test, deliberate spraying at joints or a universal pressure, gap or curing time. If instructions are missing or incompatible with the installed configuration, request clarification before proceeding.
Agree stop conditions before observation. Stop if water creates a slip risk, spreads to a vulnerable area, or if damaged glass, loose components or unsafe movement is noticed. Record the reason and refer the issue to the responsible site team. There is no need to continue until a larger puddle forms.
4. Compare scenarios without ranking likely faults
Use this matrix to choose the next evidence request. It is a proposed comparison tool, not a fault-probability ranking. More than one route may remain open, and an observation can belong to several rows. [A2 — proposed observation-to-review matrix]
| What was observed | Hypothesis to review | Evidence still missing | Next review owner |
|---|---|---|---|
| Water visibly crosses the lower door interface while the door is closed. | The installed lower-interface arrangement may differ from its intended configuration. | Component identity, installed orientation and interface detail compared with the applicable drawing and instructions. | Installer and configuration reviewer. |
| Water appears higher at a side interface, then reaches the bottom corner. | A side route may explain the pool near the door bottom. | A continuous, labelled sequence linking the upper observation to the lower point; views of any hidden interval. | Installer, with the relevant interface reviewer. |
| Water is first noticed after opening the door. | Door movement may carry retained water outward; another earlier route remains possible. | Door position and timing before and after movement, plus the first visible crossing. | Installer reviewing the actual movement and water-management details. |
| Water pools outside, but no enclosure crossing is visible. | The visible enclosure route is unresolved; adjacent wet-area interfaces may require separate review. | Earlier observations, view limits and a site assessment of the surrounding construction. | Site coordinator to assign enclosure and building reviews. |
Do not convert an evidence request into an instruction to alter the assembly. For example, recording a lower-interface detail does not establish that its clearance is wrong. Its suitability depends on the selected configuration and the applicable documentation, not a generic dimension found online.
5. Keep enclosure and building reviews connected
Keep separate entries for the enclosure’s water-containment interfaces and the surrounding building’s waterproofing. Link them through shared location and photo references. This prevents a door-focused discussion from silently treating every wet-area symptom as a door component issue.
BCA’s guide introduction covers waterproofing design and workmanship for internal wet areas. S2 — official introduction
The proposed division is a way to organize questions, not to assign contractual liability. Ask the site coordinator to identify who should review the enclosure, wall or floor junctions, and other relevant construction. Neither a photograph nor this checklist determines which party must pay for a repair.
If observations point toward an interface outside the enclosure review scope, carry that evidence into the building review. Keep unanswered questions visible in both records so one team’s incomplete inspection is not mistaken for another team’s clearance.
6. Decide what evidence is needed before changing a seal
A useful handover states the observed symptom, the remaining hypotheses and one next action for each unresolved point. Identify the responsible role, the document or observation requested, and who will review the response. “Replace the bottom seal” is a proposed action; it is not evidence that the seal caused the leak.
If a change is approved, record the component reference, configuration revision and authorized scope before the work. Keep the original observations. Have the responsible parties agree how the outcome will be assessed under applicable instructions, including conditions that would require further review.
A symptom that is absent during one later observation should be recorded with those observation conditions. It does not establish performance under all use conditions, nor does it necessarily explain the earlier route. Close the cause assessment only to the extent supported by the recorded evidence. [A3 — proposed handover and review workflow]
Prepare a leak observation record for your custom project
AimeShower works on non-standard, made-to-order OEM enclosures. Identify the supplied or proposed configuration and its drawing revision when requesting a discussion. Seal selection, interface details and any replacement or modification need project-specific confirmation; a catalogue image is not a part-compatibility decision.
The blank Leak Observation Record separates the earliest observed crossing, final pooling point, normal-use conditions, hypotheses and missing evidence. Use job and role identifiers rather than personal data. Completing it records questions for review; it does not approve a repair or confirm a cause.
If a project review leads to an enquiry about a proposed configuration or replacement, attach this observation record to the custom enclosure quote brief. Identify the existing configuration, drawing revision and unresolved compatibility questions; an enquiry does not approve a repair.
Sources and the points they support
S1 — KOHLER, Installation and Care Instructions, 1246188-2-E. English printed/PDF page 2; ©2017. Supports location-specific checks only, not AimeShower parameters. Original PDF
S2 — Building and Construction Authority, Waterproofing for Internal Wet Areas. Second Edition; web introduction only. Supports scope only; no chapter-PDF claims or compliance inference. Official introduction
A1–A3 — original editorial analysis. The evidence vocabulary, schematic, matrix and handover sequence are proposed tools for this article, not a manufacturer-prescribed diagnostic method or reported factory experience. They contain no customer case, measured leak data, fault probabilities or performance guarantee.